How to Photograph Antiques for Identification
Your first photo got "no idea" from the Facebook group. The piece is probably fine. The photo is the problem. Here are the three shots that decide what an antique is, and how to take them with the phone in your pocket.
To photograph antiques for identification, take three sharp photos in soft daylight without flash: the whole piece against a plain background, the maker's mark or underside in close focus, and a detail or wear close-up. Add the back, construction, any damage, and something for scale if you can. The mark shot is the one that most often settles the answer.
Why the first photo usually fails
Most "what is this?" photos have the same three faults. They are taken from across the room, so the piece is small in the frame. They are lit by an overhead bulb or a flash, so glaze and silver turn into white glare. And they show only the front, when the thing an expert actually needs is on the bottom.
An experienced dealer can often guess the category from a front view: "Victorian," "a Staffordshire figure," "mid-century." But the maker, the rough date and the difference between an original and a later copy usually live in the details. Heritage Auctions puts it plainly in its photo guidance: signatures and marks are important clues to identifying makers and dates. If the mark isn't in the photo, nobody can read it, whether that's a person, a search engine or an app.
The three shots, step by step
If you take nothing else from this page, take these three. Clear a spot near a window first, and put down a plain sheet, towel or piece of card as a background.
- Shoot the whole pieceFill most of the frame with the object, straight on, in soft daylight, against a plain background. Show the full outline, including feet, handles, lid and finial. This is the shot that tells anyone looking what kind of thing it is, its shape and its style. For a pair or a set, one group shot first, then the best single piece.
- Shoot the maker's mark or undersideTurn the piece over and photograph the base, the back of the plate, the inside of the drawer or the reverse of the frame. First a shot of the whole underside, then a close-up of the mark, signature or hallmark on its own, filling the frame and in sharp focus. On silver, look along the back of the handle or near the rim underneath. This is the shot that most often decides the maker and a rough date.
- Shoot a detail or wear close-upPick the spot that shows how the piece was made or how it has aged: brushwork on a painted face, the joint where a handle meets the body, wear on a foot rim, a dovetail on a drawer, the edge of a gilt band. Real age tends to show uneven wear where hands and tables touch it, and this shot lets someone judge that.
Three photos is a working minimum, not a limit. Auction houses that give estimates from photos tend to ask for three to five, and phone photos are fine for that.
Extra shots an appraiser will ask for
If you're sending photos to an appraiser, an auction house or a collectors' group, save everyone a round of "can you send another one?" by adding these:
- The back or reverse. On paintings, prints and frames, the back often carries gallery labels, stamps and handwritten notes. Heritage calls reverse photos "very helpful," especially for two-dimensional works.
- Construction. For furniture: a drawer pulled out to show the joints, the underside, the back panel and the hardware. For a lamp or clock: where the parts join.
- Damage and repairs. Chips, cracks, missing pieces, old glue lines, restoration. Condition changes value, and hiding it only wastes time later.
- Scale. A ruler, a coin or a hand next to the piece in one shot. Or measure height, width and depth and write them in your message.
Before you photograph anything, write down what you know about where it came from: who owned it, where they bought it, any family story. It costs nothing, and provenance can matter as much as a mark.
Light: the part most people get wrong
Good light does more for an identification photo than a better phone. The goal is soft, even light that shows surface and color without bright hot spots.
- Use daylight from a window, beside the piece rather than behind it. An overcast day is ideal. On a sunny day, a sheer curtain softens it.
- Turn the flash off. Direct flash bounces straight back off glaze, glass and silver as a white blob, often right where the mark or the painting is.
- Turn off mixed lights. A yellow ceiling bulb plus blue daylight shifts the color, and color matters for glazes, glass and gold.
- Use raking light for impressed marks. Marks pressed into clay or struck into metal (such as the impressed maker's name on some English pottery) are shallow dents with no color of their own. Head-on light flattens them. Light from a low angle, almost skimming the surface, throws a small shadow into each letter so it reads. A phone flashlight held low and to one side works well for this.
Phone technique for sharp marks
A mark is small, and small is where phone photos fall apart. These habits fix most of it.
- Clean the lens. A smudged lens is a common cause of hazy photos. Wipe it with a soft cloth.
- Tap to focus on the mark itself, not the table next to it. Wait a beat for it to sharpen.
- Move closer instead of zooming. Digital zoom enlarges pixels; it doesn't add detail. Get physically closer, but stop where the phone can still focus. If the mark goes soft, back off a little: a sharp photo you crop later beats a blurry close one.
- Steady the phone. Rest your elbows on the table, or prop the phone on a stack of books. Hold your breath for the shot.
- Shoot straight on. An angled mark distorts letters and numbers. Keep the phone parallel to the surface.
- Take several. Take three or four of the mark with slightly different light, then keep the clearest.
Reading a worn or faint mark
Old marks get worn down, glazed over or partly covered by a felt pad. A few things help:
- Try raking light from two or three directions. Different letters show up from different angles.
- For a printed backstamp under glaze, tilt the piece slightly so the window reflection moves off the mark.
- If a partial word is visible, write down exactly what you can read, including gaps, like "W_DGW__D" or "…AND." A partial mark plus the shape of the logo is often enough to narrow it down in a mark reference.
- Photograph any numbers, letters or symbols near the main mark too. Pattern numbers, painter's marks and registration numbers can be as useful as the name.
Once you can read the mark, the next step is working out what it means. Our guide to pottery marks on the bottom covers what country names and registration marks tell you, and sterling or silver plate covers silver marks like 925 and EPNS.
What not to do first
It's tempting to polish silver or scrub a dusty base before taking pictures. Wait. Kovels advises checking condition before cleaning, and notes that removing an aged surface can affect both appearance and value. Tarnish, grime and wear are also evidence of age. Photograph it as found, then ask whether it should be cleaned at all.
- Don't pull off old labels or stickers. Photograph them. A shop or auction label can be the best provenance you have.
- Don't use filters or beauty modes. They change color and smooth away the texture people need to see.
- Don't send only a screenshot of a screenshot. Each round of compression loses detail. Send the original photo when you can.
How Vintio helps
Vintio is an antique identifier app for iPhone, and its capture flow is built around the same three photos on this page: the whole piece (required), then the maker's mark, hallmark or signature, then a detail or wear close-up. Each step says why that shot matters, so you're not guessing.
You can also pick photos already in your library, like the ones a cousin texted you from the house, and add a note about where the piece came from. The result gives what it likely is, a rough era and origin, an estimated value range with its reasons, and a confidence level. When a shot is missing, the result usually says so and lists "Photos that would help." It's an AI estimate for guidance, not a professional appraisal. Get Vintio on the App Store.
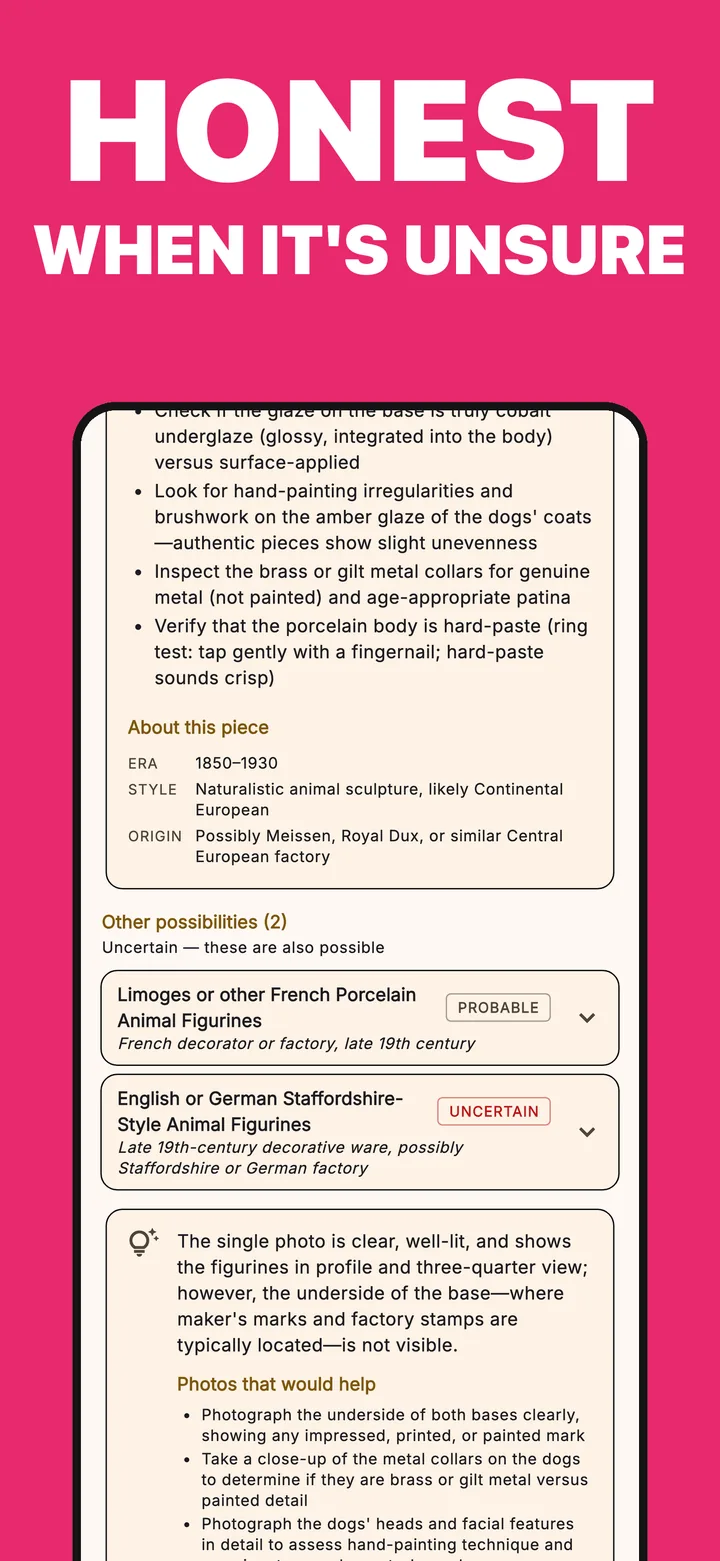
That screenshot is the whole argument of this guide in one screen. With only the front view, the result stays open between several possible makers. The shot that would narrow it down is the one people skip: the underside.
Frequently asked questions
Should I use flash?
Usually not. Direct flash causes glare on glaze, glass and silver, often right over the mark. Use soft daylight from a window instead. The exception is a phone flashlight held low and to one side, which can make a shallow impressed mark readable.
How do I photograph a stamp that's hard to read?
Clean the lens, turn the flash off, and light the mark from a low angle so each letter casts a small shadow. Tap to focus on the mark, keep the phone parallel to the surface, and take several shots from different light directions. Write down any letters you can read, including gaps.
How many photos does an appraiser need?
Auction houses that estimate from photos commonly ask for three to five. Cover the whole piece, the mark or underside, a detail or wear close-up, the back, any damage, and something for scale. Ask the appraiser what they want before you send, since some have their own list.
Should I clean an antique before photographing it?
No. Photograph it as found. Cleaning or polishing can remove an aged surface that matters to value, and tarnish and grime are evidence of age. You can dust gently with a soft dry brush, but ask a specialist before anything more.
Can I use photos someone texted me?
Yes, as long as they are sharp and show the underside or mark. Ask for the original photos rather than screenshots, and ask for any missing shots from the list above. In Vintio you can pick photos straight from your library.
Updated September 25, 2026. Photo advice reflects guidance published by auction houses including Heritage Auctions and by Kovels. Vintio gives AI estimates for guidance, not professional appraisals.

Three good photos. One honest answer.
Vintio walks you through the whole piece, the mark and the detail, then shows what it likely is, a value range with reasons, and how sure it is.

On a computer?Scan to get it on your iPhone.
Free to download · 3 free identifications · Pro is $4.99/week with a 3-day free trial, or $39.99/year · iPhone, iOS 15+